
I love my 6 string Ibanez SoundGear bass. I bought it in 2016 and I love its punchy sound. It has sustained me through many gigs. When the onboard preamp started intermittently cutting out, a cold pit of dread grew in my stomach. I don’t have a backup bass. This could lead to major dollars tossed at a guitar repairman (the nearest one is about 75 miles from me). Worst case, a replacement guitar would set me back a thousand bucks. So, being of sound mind and also more than a little bit cheap, I decided to fix it myself.
If you are facing a similar problem, read on! I will include details the internet seems not to know.
Diagnosis
Symptoms and observations: My main symptom wasn’t subtle. My bass went from strong, clean output to extremely weak output. The weak sound was slightly distorted. A detail that makes sense in hindsight was this: if I removed the plastic cover to the electronics and poked at the wiring with a finger, touching some of the wires was audible. By stroking a wire, I made a scratching sound come out of the amp. Creepy. The rat’s nest of electronics in there looked quite clean. The only “fix” I found was to remove the battery, then snap it back in.
From this I deduced that my preamp had failed, and that by “rebooting” it with a battery removal it sometimes returned to normal operation. (Hindsight: Maybe this is right. More likely, though, my old preamp is fine, and I had a wiring break elsewhere. You’ll see why I think that if you read to the end.)
Decision
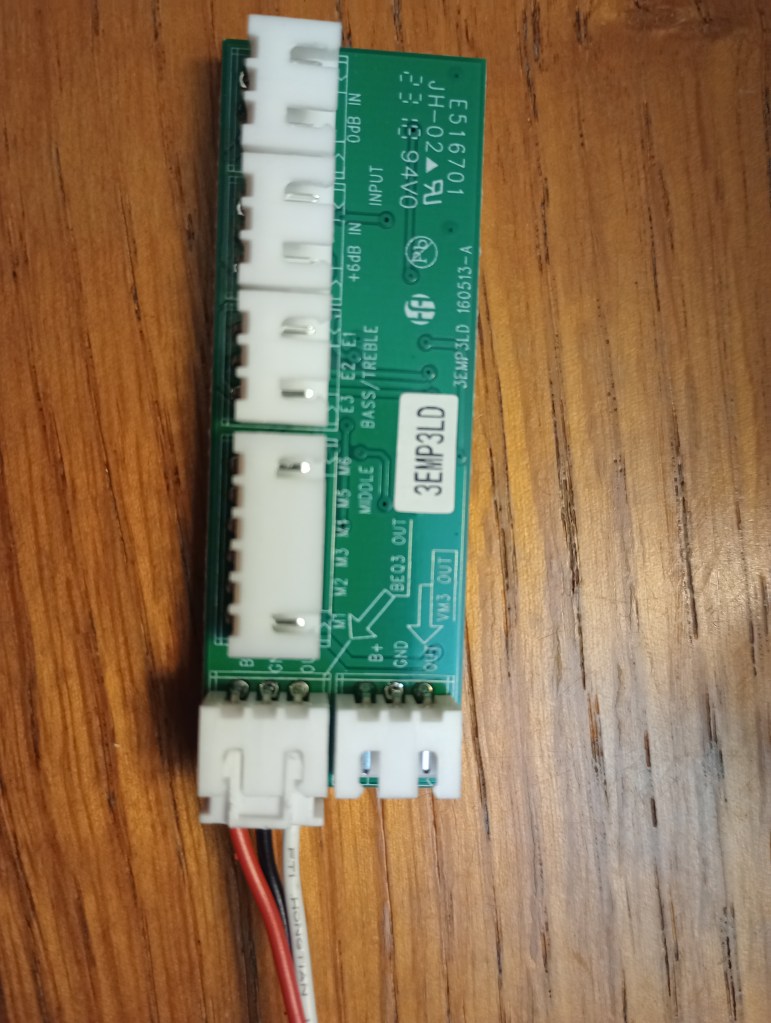
I resolved to fix this myself, and hit the internet for the replacement preamp. The internet said I needed a 3EMP3LD, an integrated circuit that looks like the image at left.
“Great!” I thought, thus beginning a cycle of emotional ups and downs.
My initial elation died in a couple of ways. First, nobody seemed to be selling the thing except for overseas stores. Second, I cracked open my own bass and what was in there was different.
Let me give a quick tour of the controls and how to open the bass. My SR506 has a pickup balancer that blends between the neck pickup and bridge pickup with a nick point for equal contribution from both. There’s an overall volume control and three tone controls. To look into your bass, you’ll need a small size philips head screwdriver. Remove four screws to see the wiring.
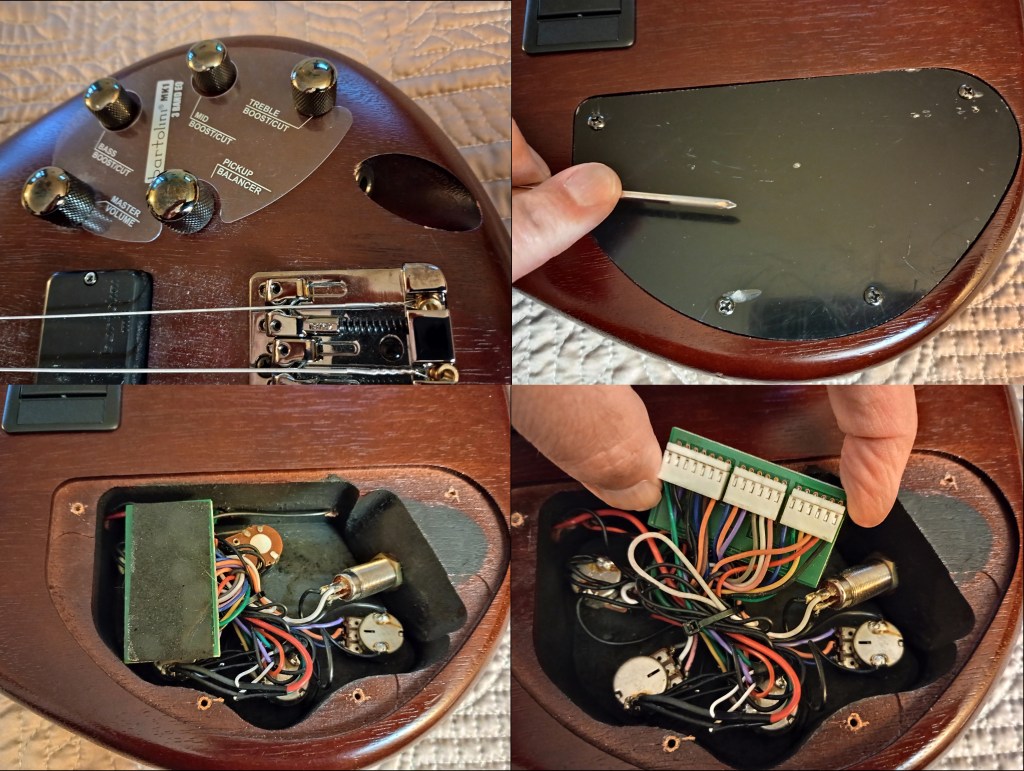
When I turned my preamp circuit board over, it did not resemble the 3EMP3LD at all. (Compare bottom-right with the 3EMP3LD pictured above.)
It turns out that what I had in there is “custom Ibanez electronics for the Bartolini MK1” that are no longer sold or supported. But I did find a circuit diagram that is an exact match. The number of connectors and even the wire colors were exactly what I saw inside my bass.

I learned that there is an outfit called Hoshino USA that is the authorized service provider for Ibanez guitars. They pointed me to Ibanez’s online parts store that Google wasn’t smart enough to find. That store’s great except for the shipping costs, which are quite high. I talked to a lovely gentleman at ibanez@hoshinousa.com to discover that Hoshino would also ship parts to you, if you communicate politely and ask nicely (and also you have to transmit your credit card information over email, which is riskier than would be ideal). The Hoshino representative assured me I might get a better deal from “online resellers,” but, again, I could never find one in my own country that I trusted.
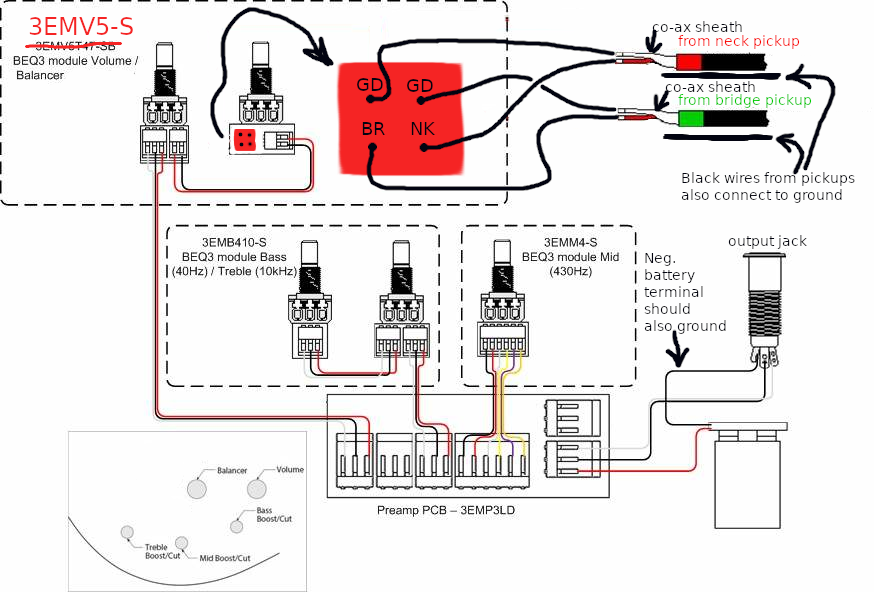
I wanted to know how to translate the old wiring diagram to the newer version before I bought parts. I found the following wiring diagram:

It wasn’t an exact match in two ways. (1) The pickups appeared to be dual-coil, meaning there were two hot (signal-carrying) wires coming from each, along with a common/ground, for a total of three wires. (2) Then there was a switch that combines these 2 x 2 = 4 signals into two. My bass doesn’t have these features, or that 3-way switch, but I was hopeful that everything downstream from the switch would be identical.
Ibanez’s new system is very modular, with plugs-and-sockets rather than lots of soldered wires. The parts store has good pictures, so I was reasonably confident that I bought the right components. In particular, instead of a 3EMV5T47-SB from the circuit diagram, I bought a 3EMV5-S because it didn’t have the extra 3-way switch.

All too soon, the day came when I had the parts. Could I find the courage to embark on internal surgery on my beloved instrument?
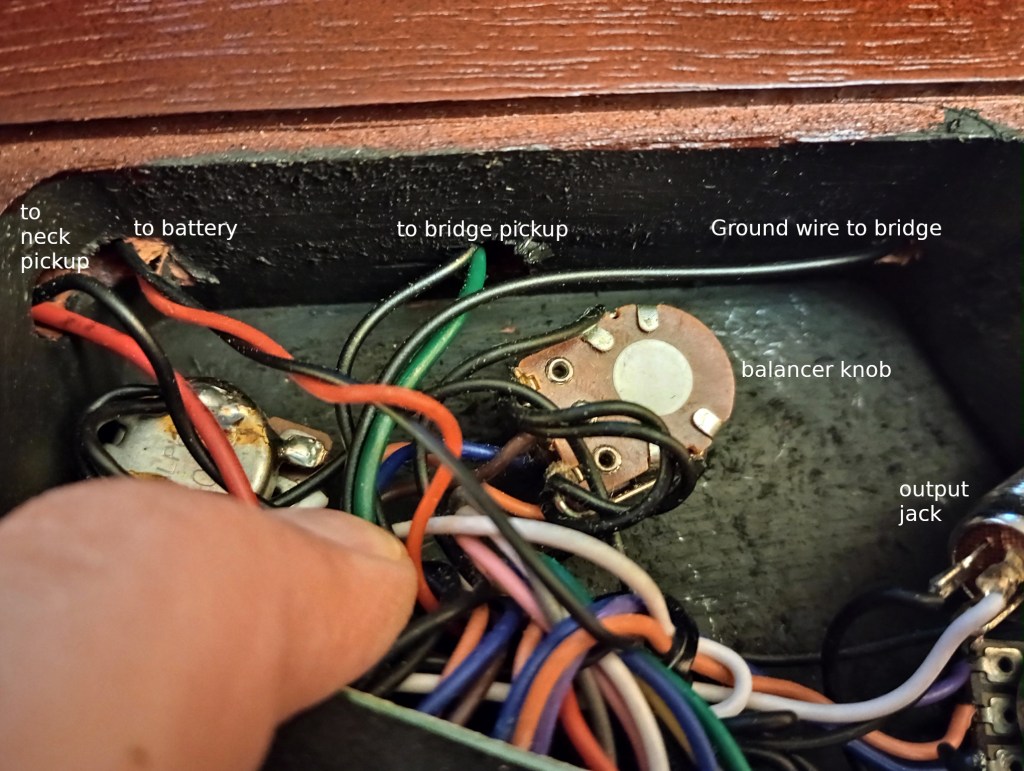
Not without trepidation, I started snipping away at its innards. (Remove 9V battery, first!) Wires from the output jack, pickups, battery, and a ground wire that connects to the bridge/tailpiece were preserved.
Knobs are removed with a small allen wrench.

When it’s bare in there? Yeah, that’s scary. I guess I’m committed to the project, now.
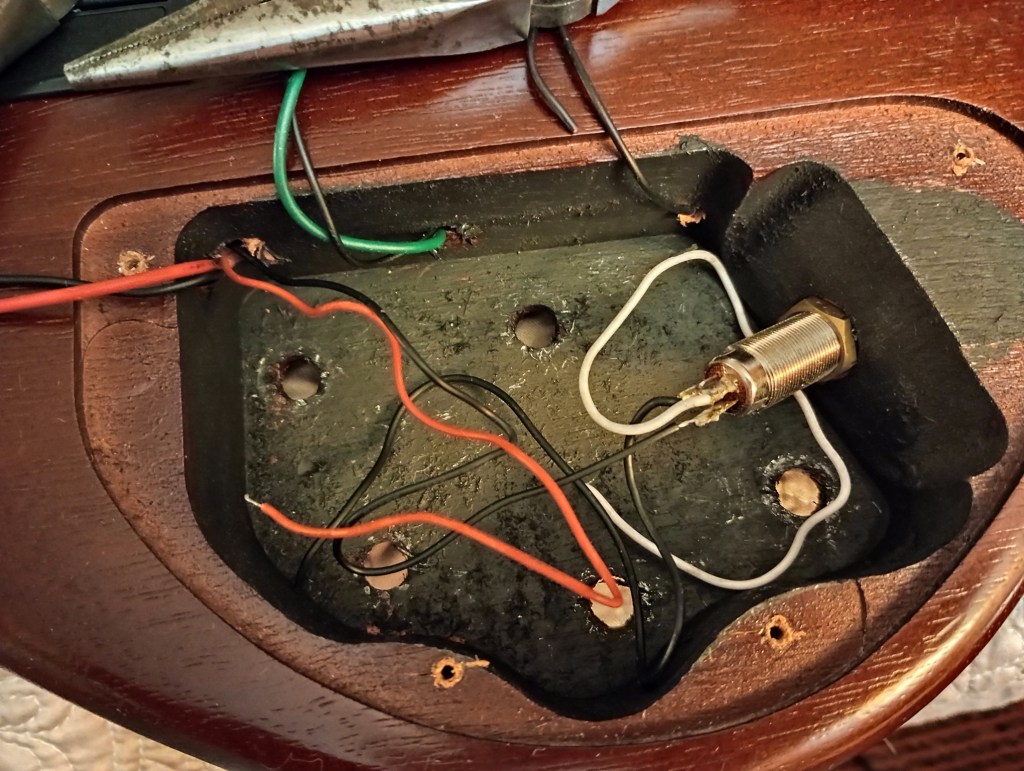
I rewired the output first. The negative terminal of the battery connects to one of the terminals of the output jack. I left that alone. (OK, not quite. True confession. I actually accidentally yanked it off, but I soldered it back on, quickly and sheepishly.)

The output plug on the preamp has three wires, black, white, and red. Not by coincidence (I presumed, correctly), I had a red wire coming from the positive terminal of the battery and white and black wire from the output jack. I twisted them all together. I threw in the black lead that connects to the bridge and tailpiece, which is also supposed to be ground. I heated up the twists and soaked them in solder, then taped them up with a little electrical tape.
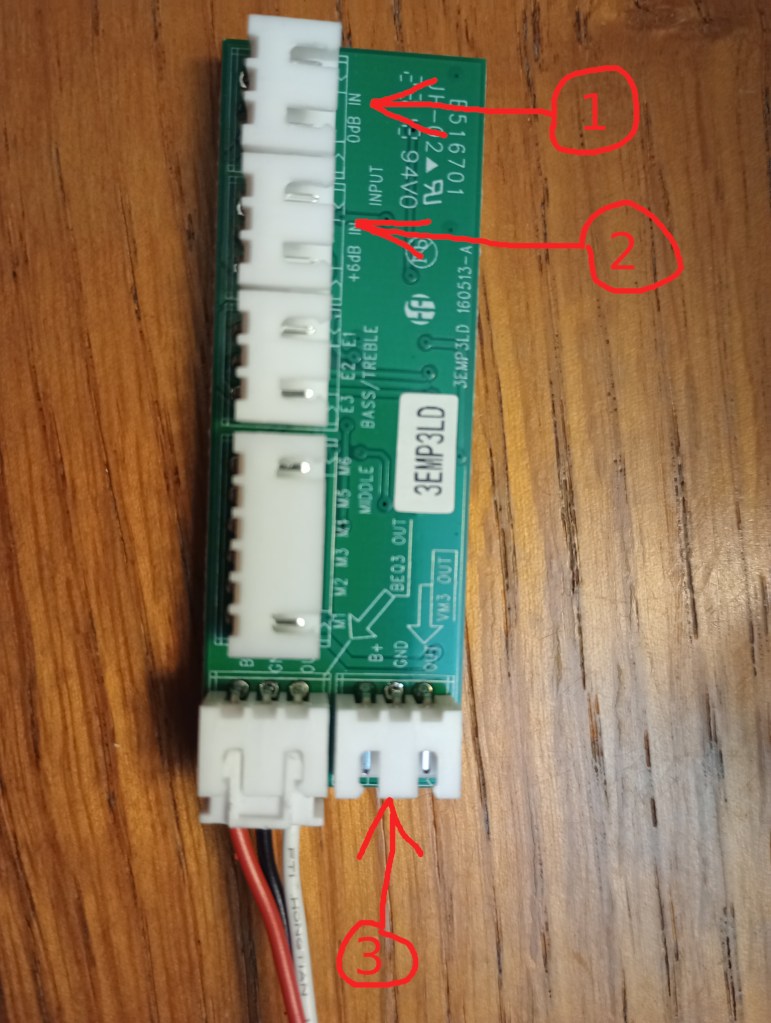
Quick notes on preamp options: (1) For shipping, I suppose to minimize shipping possible damage, the output plug is stuck into the #1 position, above. That’s potentially confusing. But, (2), there are two options for where to place the output plug. The BEQ3 is the one that emulates the original electronics I replaced. The VM3 (marked #3) is a flatter (I think) frequency response. I haven’t tried it, yet. The cool thing is that you can pretty easily try both, and keep the setup you want. Furthermore, (3), the pickups inputs can go into either socket #1 or socket #2, and the difference is that socket #2 is 6 dB louder. You want a louder bass? Use the other socket! The downside is that you’ll run through your battery about 2x quicker.
Now, on to the inputs from the pickups. I was worried about this, because my accounting of plugs and sockets kept coming up one short. I was thinking I would have to cannibalize a 3-pin plastic plug from somewhere to get the pickups wired into the little 3EMV5-S unit.
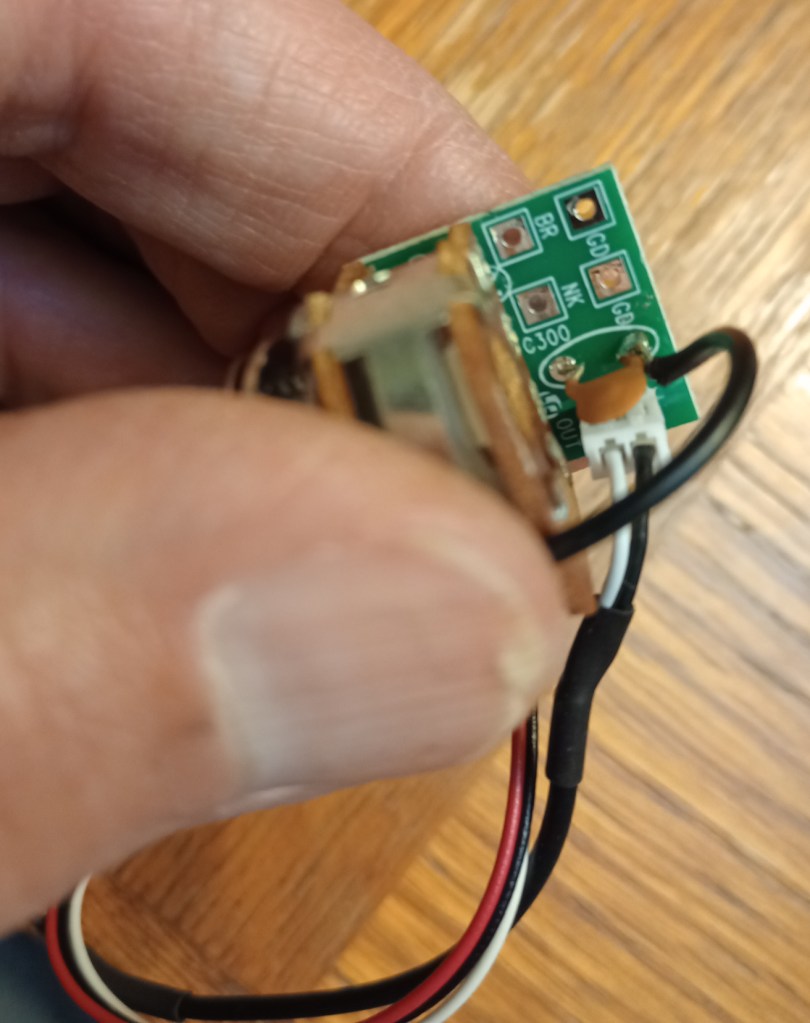
However, upon inspection, the 3EMV5-S has four labeled holes meant for soldering wires to. “GD” meant ground, “NK” I deduced meant “hot wire from the neck pickup,” and “BR” I translated as “hot wire from the bridge pickup.”
They were tiny, but I forged ahead.
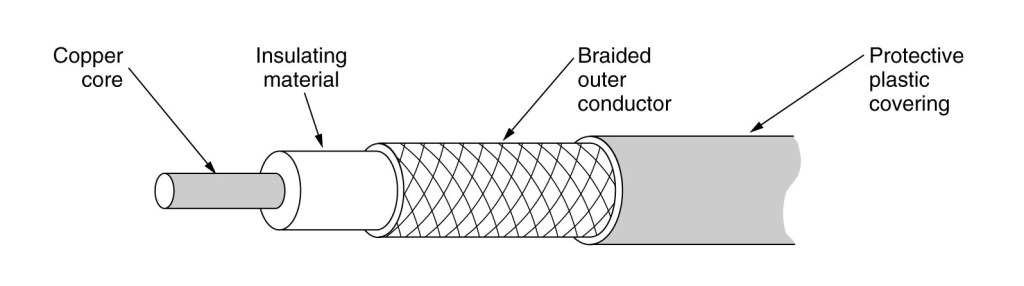
Wait. Co-axial cables?
When I went to strip the insulation away from the hot wires from the pickups, I got a surprise. The wires were coaxial: a tiny little central wire was surrounded by a sheath of netted wires. These sorts of cables have low signal losses, so that made sense, but I didn’t know what to do with the sheath. So … I did nothing. (Hindsight: wrong choice.)
I soldered the ends of the black wires to the GD terminals, and the central wires to NK and BR.
The knobs went back into place great. There was an ambiguity with the treble and bass controls, as in which was which. I assumed that the circuit diagram label (bass, then treble) corresponded to the drawing (left, then right), and I ended up being correct. Had I been wrong, the knobs would simply be in reverse order from where Ibanez put them, so no big deal.
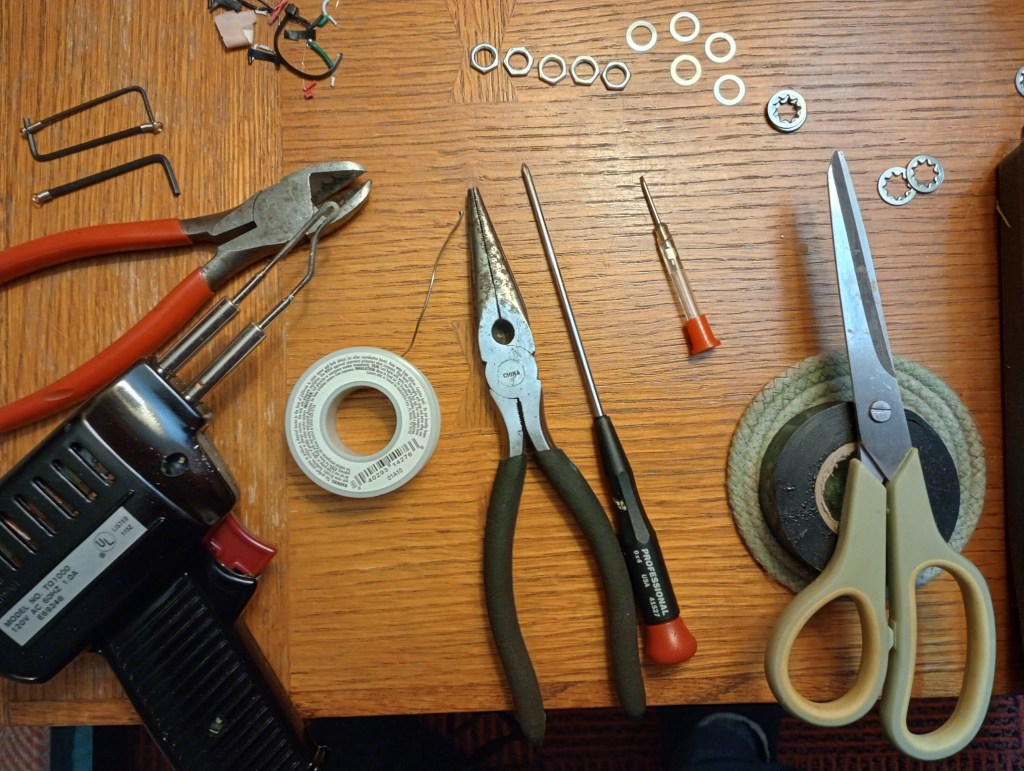
And before I forget, here are the tools needed. You do need solder and a soldering iron. Mine is clunky and horrid, but it got the job done. I needed a tiny little screwdriver to get the plug transferred from the input socket to the output socket on the pre-amp board. I bet there is a better tool for that. Some kind of pincer.
I also needed an unbent paper clip, because when I plugged my “repaired” bass into an amp, it STILL sounded super weak and slightly distorted.
[*Sad Trombone Sound*]
Furthermore, when I stroked certain wires with my finger, I could hear it through the amp. I got the impression that I might be able to pick up AM radio, too.
After I wailed and shed tears, I hit the internet again to find a tip on what to do with the shielding from the co-axial cables. The answer: ground them.
That required un-soldering my hot wires from the 3EMV5-S so that I could strip off more insulation and expose the shielding. To clear the solder from the terminal holes, I heated them up with the soldering iron, then poked the paper clip wire through. This was fussy and nerve-wracking, but in the end it was accomplished without frying the circuit board in the process.
On the second try, I soldered the co-axial sheaths to “GD” and the hot wires to “NK” and “BR.” I just left the black wires attached, and I think this is basically okay. When I reassembled the instrument and plugged it into an amp . . .
Success.
Whew.
Also, wow, this bass sounds great.
The original problem may have been a preamp failure, but maybe not. Due to that odd yet precise symptom of “when you scratch a wire, you hear it,” I am fairly sure that the shielding from the coaxial cables leading from the pickups had developed a fault. That fault could have been in the preamp module, but it is more likely to have been among the loose wires curled around. The question is, could I possibly have traced it? With the advantage of the hindsight I now possess, probably yes. But it wouldn’t have been easy. I would have to expose wire in various places (with my decidedly un-optimized hand tools) and test conductivity with a multimeter. I am totally at peace with my chain of decisions, now that my bass rocks again.
I spent about $100 for the parts, but I could have done significantly better had I known what I know now. I would have wheedled and cajoled my contact at Hoshino USA for a direct sale. You can also buy Chinese knockoffs on Amazon for $25 or so. They probably work. They probably do not sound as good.
I hope this article helps somebody. Feel free to leave me comments. Especially about if you know that there are actually and USA parts dealers that will sell you Ibanez parts.
Oh, wait, one more picture: a wiring diagram for my situation, the SR506 with Bartolini MK1 pickups.
Predictably, perhaps, with my newfound confidence, I am contemplating supplying my ancient Carvin LB70 bass with new electronics.

Thanks very much for your article. I also have an Ibanez bass, and can find next to nothing about repairing, or parts for them. Thx again.
LikeLike
Thank you for this info. I converted the SR506 into a fretless bass and gave it a brand new green burst finish. I was going to put new pickups in, but decided to go with the factory ones first to see how I would like the sound with the neck converted. So I wanted to study about the electronics wiring. Thanks so much.
Andrew Riddle
LikeLike
My pleasure!
LikeLike
hey there, can you give any additional details on how you spliced the coaxial wires.
thanks, Andrew Riddle
LikeLike